Wednesday 29 May 2013

Sweet little pretties, little embroidery swap (part 1)

Hi everyone

As you all know, I've been taking part in some swaps recently :)
This one was run by Lisa from http://www.sweetlittlepretties.com/

Here is the item I made for my partner of this swap...


The embroidery design is my own (yep! I designed it and hopefully one day soon I'll get my but into gear and organise myself enough to write up a pattern and release it for sale :D)

I've used cotton fabric, the red/white/black fabric was found in my MIL's stash (and I nicked it :P), the black was bought from spotlight; the lace was bought from a local op shop; and I used a lace zip to finish the item off.

I decided to turn my embroidery piece into a zipper pouch so that it would be useful for my partner (I hate when the things I make end up sitting on a shelf because they are "to good to use" - mum,  grandma, yes this comment is aimed at you :P).

My partners favourite colour combination was Red/Kraft/Black...how do you think I did? :)

My partner has received her embroidery piece...
"Emma,
Thankyou so much for my little pouch, I love it and I have a thing for pouches too!!
It's perfect in colours, your needlework is wonderful."

I'm so glad you liked it Sonia :)
Sonia's blog is http://mythoughtsbysonia.blogspot.com.au/ head over and have a look at her lovely work :)

I'm still waiting on my little embroidery piece to arrive...when it does I'll let you all know :)

Oh, and the little monsters been sick, so I haven't finished my mat for the sew along...hopefully I'll finish that later this week :)

Emma
Wednesday 22 May 2013

Sew Delicious' Quilted Mat Sew Along - Part 1

Hello :)

Being semi-new to sewing (did you know I've only been sewing for about 2.5 years?) I am only just beginning to discover the online sewing (and handmade) community.  I have started to join in with swaps that others are running, and this week I've been joining in on my 1st sew along with Ros from Sew Delicious!


Sew Delicious Sew Along

I have decided to follow Ros' tutorial and adapt it...you will see what I mean if you decide to keep reading :P

 
The 1st step was to choose my fabric.  I decided to go with a car theme (you will see why in a little bit)...so I searched in my stash and found the above fabrics.  The majority were purchased from spotlight and unfortunately they don't have the name of the fabric or the designers name printed on the selvedge's :(
The fabric on the right however was purchased from a fellow crafter (when she was de-stashing) last year...and it still had the selvedge, so I am able to let you all know what it is - "City Streets" by Jamie Wood.


Next, I prepared the fabric (instructions are found here).  You may notice that there is an extra piece of fabric prepared and in this photo...this piece is 50 x 20cm (20" x 8") - and you only have to wait a little while longer to find out what it is used for :)
 

The next step was to sew the top of the mat together (instructions are found here).

Then came the tricky part...and now you finally get to find out what the extra piece of fabric is for (and how I adapted the mat)...

On my to do list (that I wrote the other day), I stated that I wanted to make my little monster a travel car mat for his birthday in September.  So I decided to adapt Ros's quilted mat into a quilted travel car mat!

To do this I first read carefully through Ros's travel car mat tutorial and then I adjusted the size of her fabric for the car pockets so that it would fit and work with the measurements of the quilted mat.

I sewed the pocket fabric onto the mat backing fabric and created pockets for the cars (I used the same measurement as in the travel car mat tutorial to create each pocket).

Here is a picture of the prepared backing:


I then basted the mat top to my batting and stitched only the bottom 3rd so that the mat looked like this:


I then basted the mat back, with the car pockets positioned on the bottom - where the mat has already been quilted - to the rest of the already basted mat top.
 
I then stitched the rest of the mat, being careful not to go over the sections I had already stitched.
 
Here is a picture of the quilted mat so far:
 
 Mat top
 

Mat bottom
 
This is where I'm up to...I have to wait until tomorrow for the rest of the steps to finish this mat.
This means you will also have to wait for me to have time to finish this project off after the last tutorial is released :)
 
Hope you have enjoyed my journey so far :)
Emma

To do list for the little monster

Hi everyone :)

There are so many things I want to make my little monster...and it feels like I never have any time to do it!
So I'm setting myself a goal and writing a list :)

The little monsters birthday is early September...so whatever presents I decide to make him, they need to be finished by the end of August.

Goal:
I want to set a goal of at least 2 handmade presents (made by me - coz lets face it, it's fun for me, he loves it more knowing I made it for him and it saves money...sort of :P)

List: 
(I've tried to include links to the tutorials and/or patterns I plan on using for each item too)

1. Travel car mat/roll - I'm planning on adapting this tutorial with another and make him something truly unique.        DONE! Find the finished product here :)
2. Owl softie - my own design! 
4. Hobby horse DONE!  Find the finished post here :D
7. Quiet book STARTED - See the posts about this here and here...
8. Hooded vest  DONE! Find the finished product here (but I gave it to him before his birthday!)
10. Tea set - this will NOT be girly...but because he loves having pretend picnics and tea parties, I need to try and make it more boyish by using some of the 'boy' fabric in my stash :)
11. An I-spy bag using this board as inspiration :P ADDED 14/7/13

There is probably more, but I can always add to the list later :D

I'll let you know how I go...
Emma

Wednesday 15 May 2013

My pincushions have arrived!

Hi everyone :)

How is everyone? The weather in Melbourne today has been horribly cold and rainy the last few days :(
So I was feeling a little flat...that was until the postman knocked on my door :D

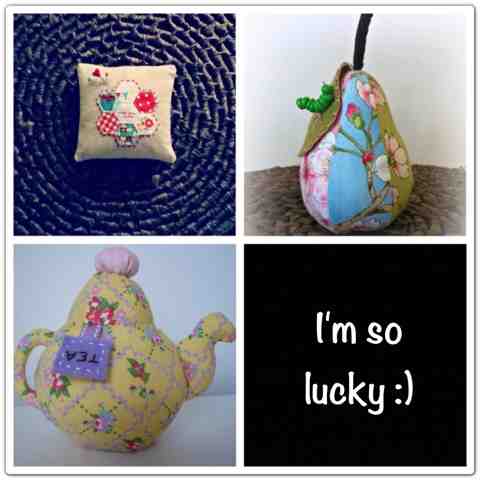
The pincushions that I received during the pincushion swap on May 10th 2013 arrived today! And they really have made my day :)

They are all so well made and are also so much more beautiful in real life!


If you would like to order a teapot pincushion for purchase, please contact Geraldine from http://www.facebook.com/3pollybugs

If you would like to order a pear pincushion or a lovely hexie pincushion for purchase, please contact Kristy from www.facebook.com/monkeymaicreations

I love them all so much I'm having trouble deciding which is my favourite :P
And which one to stick pins into 1st :D

What a great day today turned into :)
Emma

Friday 10 May 2013

Pincushion swap update :)

This swap is being run by Kristina from Harley Barley Designs
 
Here are the 3 pincushions I made for the swap:


The swap happened tonight, and I still have yet to receive my lovely new pincushions but they are sure to arrive shortly in the mail :)

Kristina made the swap extra fun by having a fun competition and prizes too...we all had to vote for:
1. Best overall Pincushion
2. Most original design
3. Best use of colour
4. Best use of embellishments
5. A Just because Prize, you don't know why you just think it deserves a prize

And here are the winners pincushions, (they are all really wonderful!):

1. Best overall Pincushion - made by Sherrilee 

2. Most original design - made by Annette 

3. Best use of colour - made by Krystal 

4. Best use of embellishments - made by Annette 

5. A Just because Prize, you don't know why you just think it deserves a prize - made by Kristy 

What a fun night :)

I'll be sure to share a picture of my pincushions all together when the all arrive, but in case you can't wait...these are the ones that will be on their way to me shortly!


Thanks for a heap of fun Kristina! 
I can't wait for the next swap :)

<3
Emma 


Wednesday 8 May 2013

Playing catchup

Hi everyone!

I'm playing catch up today :)

Today is the day where I post photos of finished items that I have been meaning to post for AGES!

So...here are the finished monster softies from the monster drawing competition I held earlier this year:


The winners were so pleased when they received their monster softies I the mail too - I love making little kids happy :D

Here's what the winners mothers had to say about the softies when they received them:

"Our little monster arrived yesterday. My son was bouncing up and down and so excited to receive it! He took it to school for news this morning with his drawing and wants to sleep with him at night. So sweet. Thanks again for a lovely opportunity."

And

"Just wanted to let you know that our Lizard Monster arrived safely today! We are thrilled, my son has been so excited anticipating its arrival and checking the letter box each day! He was thrilled his special parcel arrived today and carefully carried it around while we were at the shops and couldn't wait until we got back to the car to open it up!
He loves it so much! He has been comparing all the features on the plush to the drawing and is amazed with it! He is now snuggled up with it in bed (it's hugging his other soft toys!) and he is going to take it for his news day tomorrow (so it arrived just in time for that!)
So nice to see him smile with everything else that is going on at the moment! Well done on your awesome work and thanks again for both creating a competition that got him creative and also for bringing a great big smile to his face!"

I have to say that the feedback I received about these monster softies really made my day, I'm so please the little recipients are so happy with them :)

Ok, next on the list, is a customer request for softies to be created using the characters from this video as inspiration.

Here is the picture of some screen shots of the characters from the video and the softies I made using them as inspiration:


My son was so sad to see the owl go into the envelope to be posted off to its new owner...I definitely think I'll have to make him one as owls seem to be one of his favourite animals at the moment :P

The feedback I received from the lovely customer is below :)

"OMG you are too clever Emma  They are amazing!!! I put them in my daughters's cot last night when she was asleep and when she woke this morning they kept for amused for almost a whole hour lol. They are perfect and so well made. Thank-you again xxx"

Again, the lovely feedback made my day :)

I have been working on my items for the swaps that are coming up soon and a gift for a little baby (due in September!!), I do wish I could show you what I've been making the little fella now :( oh well, you'll just have to wait :P

I should have a post ready to share about my efforts for the little embroidery swap,(http://www.sweetlittlepretties.com/ ), in the next week week or two...I'm pretty excited to show you all too :D 

Bye for now :) 
Emma