Pages

Monday, 30 September 2013

Selfish sewing week: Item 1 - Apron

Hi everyone

Selfish sewing week was last week, and it was all about making some items for yourself for a change :)


(This event was run by imagine gnats and made with moxie).


During selfish sewing week I started 3 items:
(*this pattern is Michelle Patterns/Keyka Lou design, it is no longer available to purchase as it has been retired)

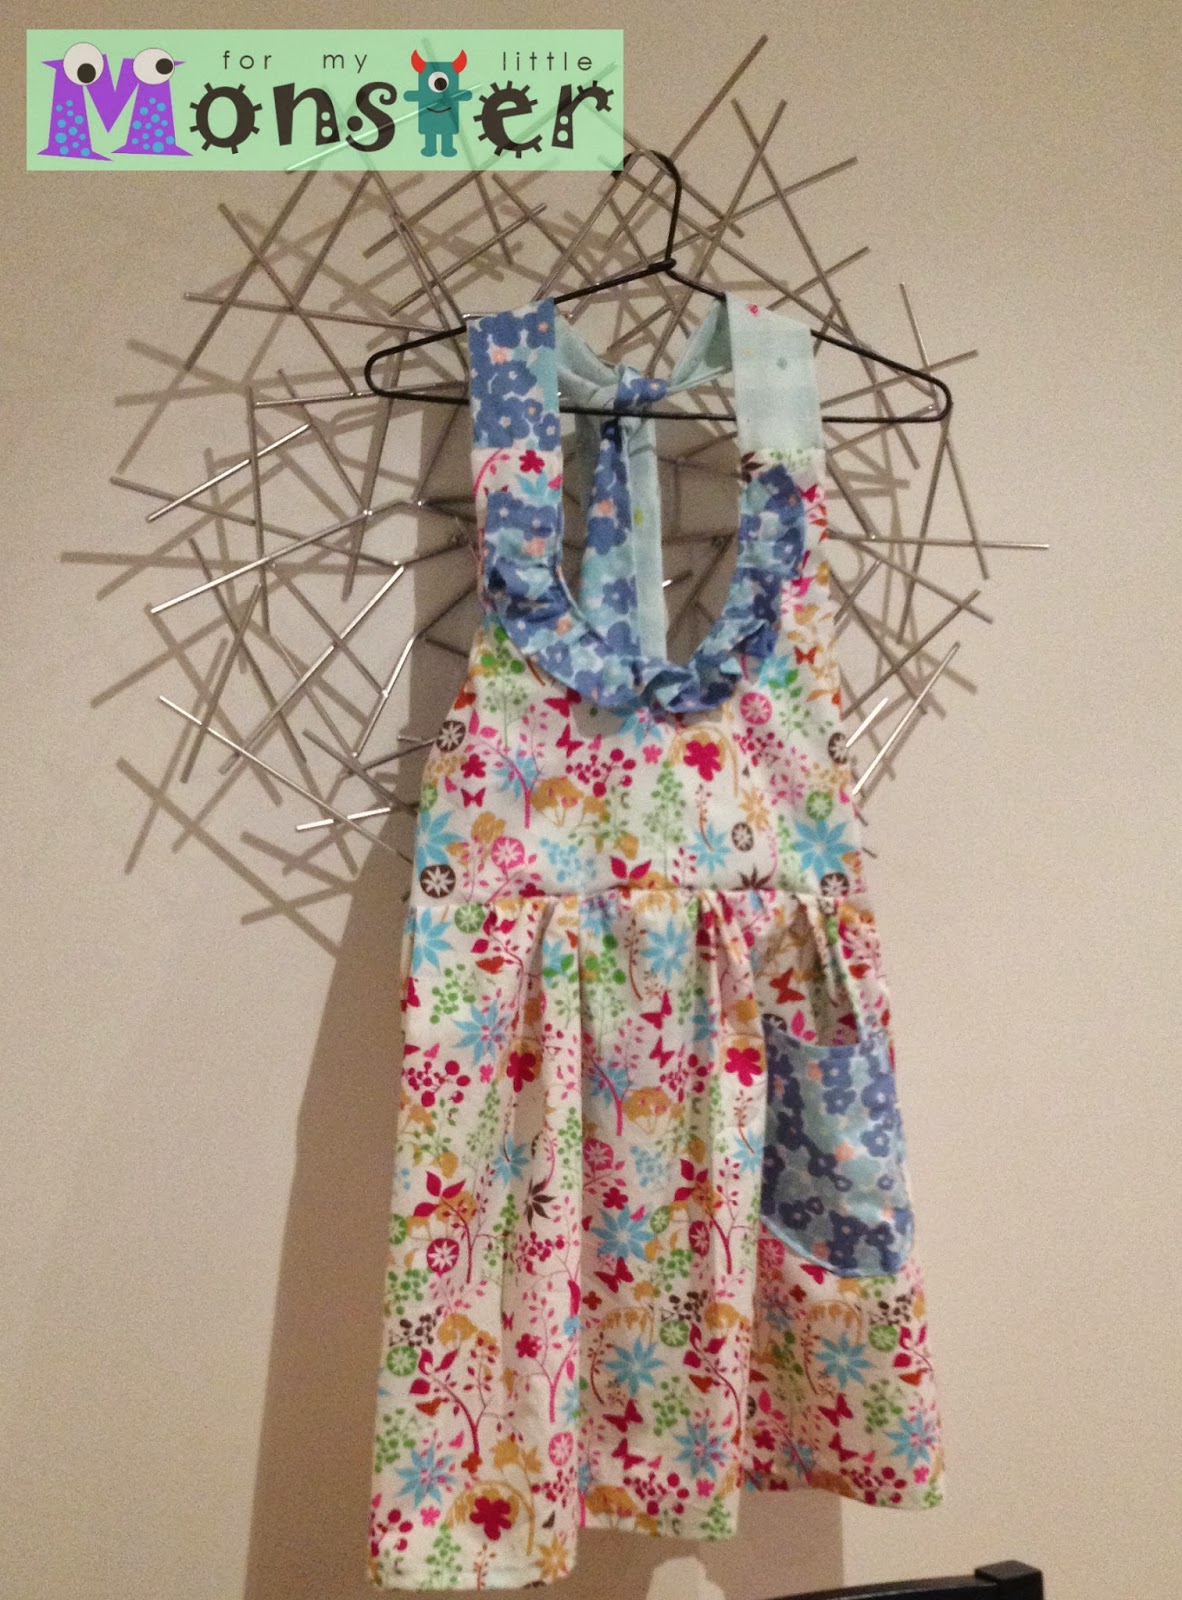
And if you follow me on Instagram you would know that I finished my first item early last week...a ruffled apron...


I enjoyed sewing this pattern (by See Kate Sew).  It wasn't difficult but it did involve a few techniques that I hadn't done before - creating a ruffle and adding a pocket, both of which I enjoyed learning and I'm really happy with the end result.


The fabrics I used are all from spotlight, and were purchased late last year/earlier this year (I can't remember when I bought them :P).  I ended up using 3 different fabrics as I didn't quite have enough of the main 2 I wanted to use.


I'm really happy I had to use the 3 fabrics in the end, as part of the reason I think I love my apron so much is because all the straps are different :D


I LOVE the finished product!


I hope you do too (but it isn't a requirement :P)

More about my other selfish items later...
Emma
Follow on Bloglovin

Thursday, 26 September 2013

Selfish Sewing Week: Progress

Hi everyone

Selfish sewing week is going quite well for me...so here is an update :)


(This event is being run by imagine gnats and made with moxie).

I have finished my 1st item...a ruffled apron using this pattern, which I downloaded free during the saw-along (which I originally wanted to join, but I had too much going on with the little monster and his birthday).
see kate sew

I sat down to start sewing the apron and 30min in...my machine decided she needed a clean :P


Then after sewing faster than the speed of light...


It was finished...
(I'll be writing another another post about this apron shortly).

Then it was time to move onto my next item, but it was so hard to choose!


I asked on Facebook and Instagram what everyone thought I should make...most people wanted me to try the pleated tote - so hopefully I get around to trying that one-day soon!  

I ended up deciding on an iPhone wallet :)  But I couldn't find a pattern or tutorial that included all the features I wanted, so I had a look around the web...


And started drafting my own pattern.  But then, my current wallet broke (luckily just before I cut out the fabric)...so instead I purchased and downloaded this pattern...


I chose my fabrics and started cutting...


To Be Continued...
:D
Emma
Follow on Bloglovin

Sunday, 22 September 2013

Mood Board Monday | Metallic

Hi everyone

Well its Monday so... I'm joining in here:


Here is my Metallic mood board:


1. Lovely DIY vases

2. We all need some metallic thread!

3. Want some metallic napkins to complete that perfect look for your dinner party next week? 

4. And to complete your outfit for said dinner party...how about a metallic necklace?!

5. How nice would this metallic picture frame look with all those children's drawings displayed inside :)

6. A thimble...so old school :P

7. Buttons!  We all need more buttons :)

8. Want some new elbow patches on that top?  You can learn to DIY them here.

9. Did you just inherit some old silver trays from your Grandma?  Or did you find some at an op-shop? Here is a cool idea of what could be done with them rather than letting them gather dust in the cupboard...

If you want to see the other metallic items I pinned this week, head over and have a look at my Pinterest board.

Next weeks theme is Hexagonal, are you going to join in too?
Emma
Follow on Bloglovin

Friday, 20 September 2013

Its selfish sewing week next week!

Hi everyone :)

It's selfish sewing week next week! Yay :)
This event is being run by imagine gnats and made with moxie.


I'm hoping to make a few things for me...

1. A few weeks ago I planned on joining in the ruffled apron sew along over at See Kate Sew, but as it was almost the little monster's birthday I had a heap of sewing I needed to do for him instead...So, I hope to sew my ruffled apron next week :)

see kate sew

2. I probably wont have time for a 3rd item...but if I did, I would like to make myself another bag :)  I'm not sure which pattern I'm going to tackle next though, I'm tossing up between:

- Another supertote (here is my 1st one), only I would make it slightly smaller and maybe add a cross the body strap rather than have the handles as then I can have my hands free :D

Also, if I did make another super tote...I'm thinking about making the front pocket like this:

- The Belle bag

-The Abigail bag

- The pleated tote


- The Emmaline bag pattern

Or maybe I just need to make myself an i-phone wallet?

Or a new purse?

Decisions, decisions...which do you think I should try?

I might be a little ambitious, but hopefully I'll be selfish enough to finish at least one of these projects next week :)

Are you planning on joining in?  What is on your "to make" list?
Emma
Follow on Bloglovin

Wednesday, 18 September 2013

Teapot Challenge: Bat-Tea anyone?

Hi everyone :)

I finished my entry for Chook Shed Designs teapot challenge last week :)

And here it is....


Bat-tea anyone? :D

I'm so please with how he turned out!


To create him, I drafted some new pattern pieces (and re-jigged others) from Jodie's Ulrich Little Heart pattern.


Jodie was so kind to gift the patten to me when I met her back in July, and I've been wanting to make him for the little monster...but I haven't had the time!  So when the teapot challenge came up and I came across this teapot on Pinterest...

I just knew which pattern I would adapt to create my teapot for the challenge :)

Let me show you the progression...

It's like it was just meant to be!

I decided to make Batman, as the little monster has a few Batman toys and some Batman jeans, and it is so cute to hear him say "mat-man" when he sees the bat symbol :P


Another challenge I set myself when I decided to take part in this competition was that I was not able to make any new purchases to finish my teapot...and I failed :P

It was not my fault!  I promise!  I had to purchase some little plastic pellets to weight the bottom of Batman properly - can you believe I didn't have any??  I did consider cutting up one of the little monster's other toys (that he isn't to attached to) to get those little plastic pellets...but in the end I couldn't do it :(  So off to spotlight I went :P

Every other item came from my stash though :D
- black poly/cotton fabric, purchased from the remnant bin at spotlight over 6 months ago
- cotton flannel (I think?), used for Batman's face, purchased for $0.20 at an op-shop
- black wool blend felt, from my stash
- yellow quilting cotton, this I luckily found in my scrap bin, and there was JUST enough left :D
- non-allergenic premium toy fill
- black and yellow DMC embroidery thread

Originally I tried to embroider Batman's face on, but the fabric I used is very loosely woven and the threads kept pulling all the way through...so instead I drew on his face using fabric marker, and I think he turned out really well!


The little monster loves him, and now I get to cross another item off the little monsters list too :)

Voting will begin the night of Wednesday 18th from 9pm EST and run until close of Challenge at 9pm EST Friday 20th.  

For more information (and to have a look at the other AMAZING teapots), head over to Chook Shed Designs Facebook page :)


Now to go and wrestle Batman away from the little monster...I want a turn :P
Emma


Follow on Bloglovin

Monday, 16 September 2013

The Little Monster's "Robot" Party! (Part 2)

Hi everyone

If you missed Part 1, it can be found here :)

Now where was I?  Oh right!  The all important Party bags :P


I found some cheap ($3 for 10) noodle boxes at my local K-mart, and set about decorating them with robot stickers.  I think they turned out great!


What's in a Party Bag (AKA Lollie bag - although ours were not full of lollies...)?

Each bag contained:
  • 2 sets of cards made from this free printable - the reason I included 2 sets is so some games could be played with them, eg. matching the pairs type games, and snap or "go fish". I had them printed at my local officeworks for $28.50
  • A clip in the chape of a star (with a robot "cog" sticker) $0.20 each (I bought 10 = $2 total)
  • A handmade magnet* - made by me (using materials I had in my stash).
  • Homemade chocolates (using the same mould I showed you earlier).
  • Some robot stickers.


* Do you want to make your own magnets for party favours?  Here is how I did it :)


Materials:
- Stick on magnets
- Scissors
- Coloured card
- Stickers (mine were robots, to fit with the theme of the party)
- A compass (to draw your circles) 

How to make them:
1. Decide on a size to draw your circle with the compass.
2. Draw your circles onto your coloured card 
(as many times as you like - I drew 10, as I had 10 little monsters to make party bags for :P).
3. Cut out all your circles.
4. Stick a small amount of magnet to the reverse side of your circle.
(I cut the magnet to be about 5-7cm long for each of my circles).
5. Choose a sticker and stick it in the center of the circle on the front side.

And your finished!


And what was the total cost of the party (not including food)?

Part 1 = $24.99
Part 2 = $33.50

Total = $58.49

I hope you enjoyed my version of a Robot Party :D
Emma
Follow on Bloglovin

Sunday, 15 September 2013

Missed out

Hi everyone

An unfortunate event meant I couldn't attend crafty hijinks today :(


I have been looking forward to it for months, so it was very disappointing not being able to go, I ended up gluing myself to Instagram (#craftyhijinks) and enjoying the event this way instead - it looks like it was heaps of fun for the ladies who made it!

So, it got me thinking about other crafty (and/or bloggy) events that might be available to me (and others) in and around Melbourne in the near future...I thought I would share what I found, in case anyone else is interested and wants to know about them too :)

Have you heard of thread den 
They run social sewing nights and also have heaps of sewing classes (that cost $) available.

Or what about brown owls
Regular crafty catch ups are run in various states and areas...I'm hoping to give one a try soon!

Can do books have regular afternoon or evening sewing sessions and it only costs about $5

Or if your into having a drink while you stitch, these stitch and sip sessions might be more your style.

Or if you want to meet up with friends who are crafty (or who have crafty kids in tow) you might like to try crafternoon cafe.

As you can see I found quite a few crafty ones but not any bloggy ones :( maybe I'm searching for the wrong thing?

If you know of any others I'd love to hear about them! Just pop the details in the comments section :D 
Thanks!
Emma

Sunday, 8 September 2013

The Little Monster's "Robot" party! (Part 1)

Hi everyone!

The little monster turned 2 last week and we had his party the other day...

I didn't put as much effort into his 1st birthday party, as I just wasn't in the right frame of mind to do so.  So this year I wanted to make his birthday party extra special :D

A few months back the little monster and I had a good look through this book, and he decided on the Robbie Robot cake...(The little monster has been robot mad for ages now - and even more so now that he is talking, "bow-bot, mama, bow-bot!")


This set the theme for the whole party, and I think I made up for doing a bad job last year - as I went a little Robot mad :P

When planing a party where do you go? Pinterest of course! 
Here is a little sneak peek at my board for the little monsters 2nd birthday party:


We sent out these INVITATIONS nice and early...
I found the design here at tiny prints :)
Tiny prints are great to deal with - this is not the 1st time we have used their services, we also ordered our birth announcements/thank-you's from them as well.

On to the CAKE
Here is a picture of the cake I made:


The little monster was very pleased, and it must have been yummy as a few of the kiddies went back for more after finishing their 1st piece!

Having never decorated a cake before, I think I have done a pretty good job :)


Now on to the DECORATIONS:
We didn't have a lot of money to spend...but I still wanted the robot theme to stand out for my little monsters special day.

I found heaps of really cute robot stickers at our local cheap shop.  I decided that these would come in handy for the decorations, (see how I used them later on in this post :D)

Stickers from a cheap shop = $10 :)

We were soooo lucky with the weather!  It was a sunny, and not too cool a morning (yes I managed to organise that well hey :P)


 **I apologise for the poor photo quality of the pictures of the party, I forgot the camera so had to use my phone.... 

BIRTHDAY BUNTING

Birthday Bunting = $0

I made this paper bunting using some wrapping paper that covered a gift that the little monster received at his 1st birthday party, some card from my craft stash, glue and some string from hubby's shed.  

To create the bunting I used this tutorial, but needed to change it slightly as the old wrapping paper was quite thin, so I:
1. Cut out triangles of the wrapping paper,
2. Glue the wrapping paper triangles to the coloured card
3. Cut the card into a diamond shape (see the tutorial for the shape you need), 
4. Fold and glue the diamonds onto the string - as shown in the tutorial

TABLE DECORATIONS


I made sure to include both healthy food and Party food, (as the party was at 9:30am - and some would say that this is too early for party food :P).

Cup cake pans and toppers

Cup cake pans (25pkt) and flag toppers (25pkt) = $4
Bought from a party shop (where everything is $2) at Southland

As you can see, I stuck more of the robot stickers to the cupcake pans and to the flag toppers to make the cupcakes (that my MIL made for me as I ran out of time to cook them!) more "Robot-y" :)

Cutlery holders
Cutlery holders = $0

I used some of the left over plastic cups that we had purchased for the Little Monster's 1st birthday, and used more robot stickers to help fit the party theme.

Serviettes and table cloths

Blue plastic table cloth x 2 = $4
Robot Serviettes x 2 packets of 20 = $4
Bought from the same party shop at Southland

Robot Chocolates

I purchased a molud to make the chocolates here
 It cost = $2.99

Total spent on robot themed party items so far = $24.99

We also served an early BBQ sausage lunch for those who wanted to have some before they all went home around 11:30am.

I hope you enjoyed my version of a Robot Party so far...part 2 is coming soon :)
Emma
Follow on Bloglovin